
What Pokémon Evolve with A Dawn Stone For Realme GT Neo 5? | Dr.fone
What Pokémon Evolve with A Dawn Stone For Realme GT Neo 5?
If you are a diehard Pokémon Go player, you probably know how exciting it is when your Pokémon evolves. Evolutions mean a boost in stats and strength in raids. Plenty of Pokémon users are conversant with the traditional raiding as a way to evolve. However, you can use special items to evolve your Pokémon. One such item is the dawn stone. In this article, we are going to take you through a detailed guide on dawn stone evolutions and how to get it with ease.
Part 1. Dawn Stone Pokémon Evolutions

What is Dawn Stone in Pokémon Sword and Shield?
Like Shiny Stone, dusk stone, Sun Stone, and Moon Stone, Dawn Stone is another peculiar evolution item in Pokémon Sword and Shield. If you combine Dawn Stone with certain Pokémon, they will evolve to another level. This peculiar stone was introduced in Generation IV, and in terms of appearance, Dawn Stone sparkles like a glittering eye.

You can get dawn stone from the Digging Duo found near the Wild Area nursery. You will, however, be required to pay them 500 watts before digging random items for you. Remember, this is a trial and error thing, and you might have to spend a lot of watts before finding a dawn stone. Also, you can get any evolutionary stone, including the Dawn Stone in the Lake of Outrage. Here, you will have to first obtain a Rotom Bike on route 9 to move across the water.
Pokémon that Evolve with Dawn Stone
As aforementioned, dawn stone is an evolution item that is used to evolve certain species of Pokémon. To evolve your Pokémon using Dawn Stone in Pokémon Sword and Shield, enter the bag menu and choose the “Other Items” tab. Hover on the Dawn Stone and select the “Use this item” option. Finally, select the Pokémon to evolve. These Pokémon that can be evolved using dawn stone include:
1. Kirlia
Kirlia is a small humanoid Pokémon whose upper body and arms are white while the waist and legs are light green. This makes it appear as though it is wearing tights. Kirlia’s natural abilities include synchronization and trace. It loves dancing on sunny mornings and becomes more beautiful when they sense e positive emotions of trainers. A vast majority of Kirlia live in the cities, although some are still found in the forest. Kirlia evolved from Ralts and has two possible evolutions, namely Gardevoir and Gallade. If it reaches level 30, it evolves to Gardevoir. However, if it is male and given a dawn stone, it will evolve to Gallade.
2. Snorunt
Snorunt is an ice-type Pokémon that was introduced in Generation III. It is also referred to as the “Snow Hat Pokémon.” You can find Snorunt in seafoam café, snow canyon, or even in Mysterious Grotto. Furthermore, you can obtain it by trading or Pokémon Roulette. Snorunt can evolve into Glalie or Froslass. If it reaches level 42, Snorunt evolves to Glalie. For Snorunt to evolve into Froslass, it requires a dawn stone. However, the Snorunt must be a female to evolve to Froslass.
Part 2. Hacks and Tricks to get Dawn Stone Pokémon
It is every player’s wish to avoid the long hunt for a Dawn Stone into their Podex. This issue has given birth to some of the hacks and tricks to help players cross territory and find the intended evolution item or Pokémon. Some of these tricks include:
1. Use iOS spoofing tool- Dr. Fone Virtual Location
Dr. Fone Virtual Location is an amazing iOS spoofer tool that allows users to fake their actual location. This makes it a good tool for location-based games like Pokémon Go. With Dr. Fone Virtual Location, you can teleport to whichever place across the globe by a click of a button. If you want to simulate movements to confuse the game app, you can simulate two or multiple points. Furthermore, you can leverage the joystick to improve the flexibility of GPS control. To teleport to any place in the world with Dr. Fone Virtual Location’s help, follow the steps below.
Step 1. Download Dr. Fone Virtual Location and install it on your computer. Once installed, launch it and then select the “Virtual Location” tab on the primary window. Also, connect your iOS device to the computer.

Step 2. On the next page, click the “Get Started” button to proceed.

Step 3. You should see three icons on the top-right of the subsequent page. Click the third icon to switch to the teleport mode. At the top-left, enter the location of the place you want to teleport to and click “Go.”

Step 4. When the program has found the location, a dialog box will appear in the background. Click “Move Here” to teleport to this location.

2. Use Pokémon Gotcha
Pokémon Go-tcha makes hunting Pokémon and evolution items much easier. With this tool, you can go for a hunt without looking at your smartphone. When you run Go-tcha Evolve on the Pokémon Go application, you can set color animations and vibrations to alert you about Pokémon and pokestops that are in range. Moreover, you can use the auto-catch feature so that you don’t have to respond to alerts. You can also check on time, your stats, and leverage the new pedometer feature to count your steps. This program comes with various exciting colors for you to choose from and a bunch of other great features.
3. Use iTools
iTools location spoofer is another good GPS mocking tool that is suitable for Pokémon Go games. By faking the GPS location, you can easily access territories where rare Pokémon or evolution items are available while seated at home or in the office. This program supports iOS 12 devices or earlier versions. However, there are scores of people who have complained about several crashes. Nevertheless, you can try it if you have got some penny to spare.
4 solution to get rid of pokemon fail to detect location On Realme GT Neo 5
Pokémon go failed to detect location is an error that is frequently faced by the players and there are several reasons for it. From device to server-based all the reasons amount to the error and therefore the right solution must be applied to get the work done with ease and perfection. The location-based attribute of the game is something that has been one of the best features. It is the sole reason for which the game is not only popular but also one of the most downloaded games of all time. It is therefore important to overcome fail to detect location error in this game.
Part 1: Why does Pokémon fail to detect location?
The two main and frequent errors that are related to the Pokémon are error 11 and error 12. These not only frustrate the users but also hamper the game experience. Failed to detect location Pokémon go is the result. This part of the article will make sure that you get all the information that is needed to overcome the issue. The GPS joystick failed to detect location error will also be overcome and you will also be able to guide others.
Causes of Error 11
- If the game failed to detect location Pokémon go fake GPS then the most common reason is the fact that the GPS has been disabled. The internet and GPS are the two important aspects of this game. If anyone is not available then it is a must that the game will not work at all.
- Once the game has been installed it requires certain permissions that should be granted for proper working. All the permissions must be accepted for the game to work fine. If the GPS access has not been granted then it should be so that the GPS joystick Pokémon go failed to detect location error is resolved and you can enjoy the game.
- To install some applications and to enhance the features of the phone it is at times rooted in the case of android or jailbroken in the case of iPhone. In both cases, you will get the Pokémon to go failed to detect location fake GPS error. It is therefore important that the issue is resolved by getting the Realme GT Neo 5 device back to its original shape. It can be done by unrooting the Realme GT Neo 5 devices so that the issue is resolved.
Causes of Error 12
- The Mock location on the Realme GT Neo 5 device is enabled can lead to failed to detect location GPS joystick or error 12 on the Realme GT Neo 5 device. It is therefore advised to make sure that the location in question is disabled to get the gaming experience back on track.
- The other and the most common reason for the error 12 is the fact that the GPS signals are not received by the Realme GT Neo 5 device. It also leads to Pokémon failed to detect location error and will make sure that you get all the enjoyment for which the game has been downloaded.
Part 2: 3 solutions to fix Pokémon fails to detect the location
Solution 1: Turn on GPS
This is the most common method that can be applied to make sure that the game works perfectly.
i. Drag the notification panel down on your device.
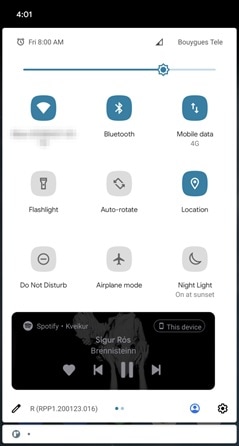
ii. Click on the location to turn it ON.

Solution 2: Setting Permissions for the application
If the right permissions are not given to the application then it can also lead to the fake GPS failed to detect location. To make sure that this is overcome you need to follow the steps as under.
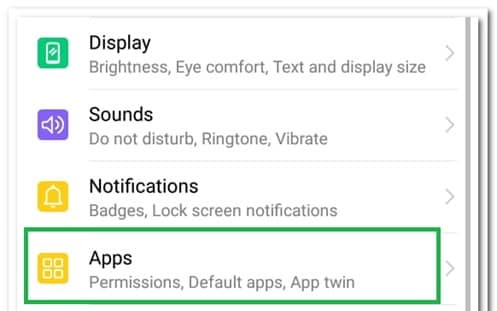
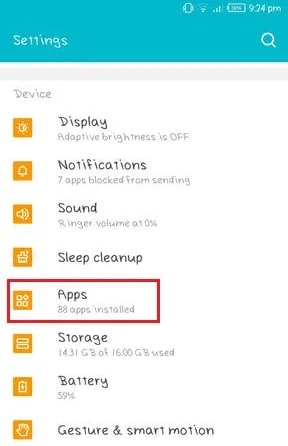
i. Go to Settings > Applications > Apps to access the permissions for the application.
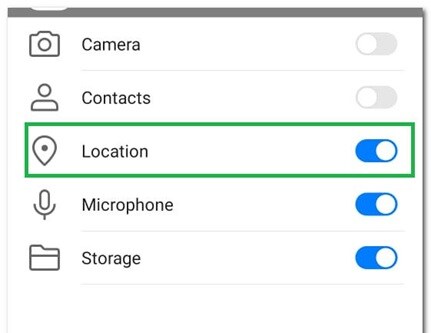
ii. Go to Pokémon Go > Permissions > Turn on location to get the issue resolved.
Solution 3: Clear Cache
i. Go to the Settings of your device
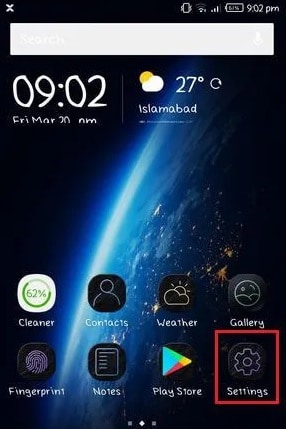
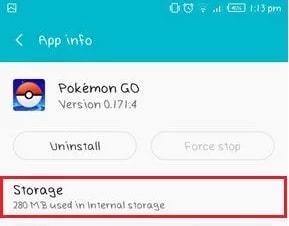
ii. Click on the app’s icon on the next screen
iii. Click on the storage option.
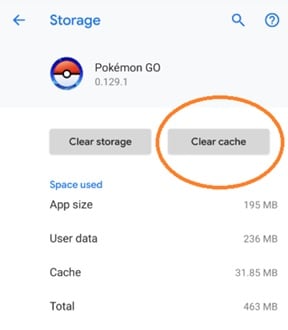
iv. Clear data and cache and restart the Realme GT Neo 5 device to get the issue fixed.
Part 3: Dr.Fone Virtual location change your location in one click
To fix the fake GPS Pokémon go failed to detect location Dr. Fone’s virtual location is the best and the state of the art program that can be used. It is not only the best but also allows the users to overcome the issues that are presented by the other similar programs. With this program, it is easy to make sure that the overall game performance improves in terms of location detection. You can teleport with ease using this program. With an intuitive interface and a professional team backing the program, you get the ultimate results. Not only Pokémon but all the location-based and AR games this program is a boon.
How to use Dr. Fone Virtual Location
Step 1: Program Installation
First of all download and install the program to get started.
Step 2: Enable Virtual Location
Click the get started icon once the iPhone has been connected to the system and the virtual location has been enabled.
Step 3: Locate the Realme GT Neo 5 device
Click the center on a button to make sure that your location is detected by the program.

Step 4: Change Location
The third icon on the upper right corner is to be pressed to teleport. In the bar type the name of the location you want to teleport to.
Step 5: Move to a teleported location
Click on move here to get to the location that has been selected.
Step 6: Validation
Your iPhone will show the same location as on the program and this finishes the process.

Conclusion
Dr. Fone’s virtual location is the best and the most advanced program that will make sure that you get the best results. It will not only enhance your gaming experience but will also remove the Pokémon go GPS joystick that failed to detect location error with perfection. It is the best program that is easy to use and there are guides online that further foster the process. With this program, it is easy to get a step ahead for all AR and location-based games and to enjoy to your fullest.
How does the stardust trade cost In pokemon go On Realme GT Neo 5?
Pokemon go has been around for a while now and has arisen as one of the most talked-about games in the gaming community. The fact that it is a location-based game and needs you to move around while playing the game makes it further interesting. Trading in Pokemon go is one of the most talked-about features. Today, we will help you explore more about stardust trade costs and how can you easily perform trades! Hang on as we dwell deeper into Pokemon go and trade stardust costs.
Part 1: How does Pokemon trading work?
So as we’ve discussed earlier, Pokemon go trading is one of the most interesting features of the game. So how does this trading work? In Pokemon Go, you can trade pokemon possessed by you with those possessed by your friends if both you and your friend, decide to mutually trade the pokemon with each other! For trading in Pokemon go, there are certain criteria you need to satisfy to qualify for trading in Pokemon go! Given below are the requirements to qualify for trading in Pokemon go
- Be at least level 10
- Be friends with the person you’re trading on Pokemon go
- Be in a radius of 100 m while you’re trading
However, Pokemon go also has levels of friendship and you can trade pokemon of different levels with friends with whom you have different friendship levels. Higher is the friendship level, higher is the level of Pokemon which you can trade. every trade requires you and your partner to spend stardust points. So There are basically 4 levels of friendship in Pokemon go
- Friend
- Good friend
- Ultra friend
- Best friend
The levels of your friendship with a player on Pokemon go increase with the increase in the number of days you stay friends with them. Within a month of friendship, you can become best friends with a player on Pokemon go! You also need stardust points on Pokemon go. So what is stardust trade cost? Before you trade any pokemon you must spend stardust coins. Not having enough stardust trade coins will not allow the trade of pokemon to happen. Hence, you must have enough stardust trade costs.
Part 2: How much stardust do you need in pokemon trading costs?
Trading in Pokemon go is quite complex. This is because the needed Stardust points will be different in every case and will depend on several factors. Factors such as whether you already half got that Pokemon in your pokedesk or not, the friendship level of you and your friend who are interested in trading, or whether the Pokemon is rare or common. Given below are the Stardust trade costs for each Pokemon.
Standard trades
- Good friend:100
- Great friends:80
- Ultra Friends: 8
- Best friend: 4
Shiny or legendary (caught by you)
- Good Friend: 20,000
- Great Friend: 16,000
- Ultra Friend: 1,600
- Best Friend: 800
Shiny or Legendary (not caught by you)
- Good Friend: 1,000,000
- Great Friend: 800,000
- Ultra Friend: 80,000
- Best Friend: 40,000
However, this Stardust trade cost may vary according to the friendship levels! Before trading, you must think of the friendship level between you and your friend and also if the Pokemon which has been traded can be evolved through trading. Evolving Pokemon through trading is another beneficial tactic that could benefit you as a player of Pokemon go.
Part 3: Ways to increase stardust in pokemon go?
1. Use Dr.Fone – Virtual Location (iOS/Android)
Do you want to increase your Stardust trade cost in Pokemon go? There is no better way for doing so other than using Dr.Fone - Virtual location (iOS/Android) . Using this will easily help you to catch more Pokemon, as you can fake your location using this app. You can change your location to any given location on the map and catch Pokemons from different regions without having to move around. Doesn’t it sound fun? Catching the rarest Pokemon all by sitting at home!
Teleport to anywhere in the world
Step 1: Firstly, you need to install Dr.Fone- Virtual location (iOS/Android) on your computer(Win/Mac). Then, install and launch the program on your computer. Click on “Virtual Location” from the options on the main interface.
Step 2: Now, you need to connect your iPhone to the PC and click on “Get Started”.
Step 3: A new window would now pop up where you can see your current location. If you are unable to see your current location, then click on “center on” icon at the bottom. Doing so will lead you to show your location on the map.
Step 4: Now click on “Teleport mode” using the button on the top right corner of the window. Enter the place you want your location to be set to and then click on “Go”. Once done the click on “Move Here”. Well, that’s it! We’re done with changing our location to the desired location!
2. Exchange the gift with friends to level up a friendship
Pokemon go also allows you to send gifts to your game friends and receive gifts from your game friends. Well, this can help both of you grow and progress in the game and can be a helpful trick to increase Stardust!
3. Play the game as much as you can
Investing more and more time on the game will lead you to catching more pokemons which will, in turn, lead to getting more stardust! Hence play it regularly with continuity!
Conclusion
Well, the article did give us a lot of idea about stardust trade cost and how to increase Stardust trade points in Pokemon go. We dwelled more into major facts about the game and learned a lot about it. We also explored what is drfone-Virtual location (iOS) and how it can help you to teleport from one place to another! Using the app will help you a lot in improving the game and wouldn’t require you to do much! All you’ve to do is teleport from one place to another, catch more and more pokemons and get more stardust! As a player, it shall improve your stats by a huge margin!
Also read:
- [New] 2024 Approved Building a Studio-Quality Setup at Home
- [New] 2024 Approved The Essential Distinctions Between Metaverse and Multimeva
- [New] Navigating GoPro Lens Distortion in Post-Production
- [Updated] Top 15 Web Destinations for Your Daily Dose of Anime
- In 2024, Best Pokemons for PVP Matches in Pokemon Go For Realme 12 5G | Dr.fone
- In 2024, iPogo will be the new iSpoofer On Poco M6 5G? | Dr.fone
- In 2024, iPogo will be the new iSpoofer On Realme C51? | Dr.fone
- In 2024, iPogo will be the new iSpoofer On Realme GT 5? | Dr.fone
- Ultimate guide to get the meltan box pokemon go For Realme 11 Pro+ | Dr.fone
- Viral Visionaries Hashes that Transform Short Videos Into Hits for 2024
- ZDNet Tests Acer's Exceptional Screen and Webcam Combo - An Unexpectedly Superior Choice in Latest Laptops
- Title: What Pokémon Evolve with A Dawn Stone For Realme GT Neo 5? | Dr.fone
- Author: Elizabeth
- Created at : 2024-11-11 08:13:56
- Updated at : 2024-11-17 01:39:05
- Link: https://pokemon-go-android.techidaily.com/what-pokemon-evolve-with-a-dawn-stone-for-realme-gt-neo-5-drfone-by-drfone-virtual-android/
- License: This work is licensed under CC BY-NC-SA 4.0.