
In 2024, Pokemon Go Error 12 Failed to Detect Location On Poco F5 Pro 5G? | Dr.fone
Pokemon Go Error 12 Failed to Detect Location On Poco F5 Pro 5G?
Pokemon Go is a popular game that has taken the world by storm. It is an augmented reality game that allows players to catch Pokemon in the real world using their smartphones. However, many players have reported encountering the “Failed to detect location (12)” error while playing the game. This error can be frustrating as it prevents players from playing the game properly. In this article, we will discuss what causes the “Failed to detect location (12)” error in Pokemon Go and how you can fix it on your Poco F5 Pro 5G.
Pokémon Go has been on the nerves of its players and this is all because of the AR notion that it presents. The failed to detect location 12 is one of the most common errors that are faced by the players while playing this game. You might not believe but the GPS signals and the location settings on iPhone or Android are the two main reasons for this error. It can be resolved with ease and this article has been written to get the work done with ease. Applying the methods explained will ensure that you get the best results overall.
Part 1: Why is Location Important in Pokémon Go?
The best part of this game is that it has been compiled keeping in view the location mechanics. The location analytics of the game has made sure that it becomes the overnight sensation. Three main attributes are associated with the location framework of the game. These attributes also show how important the location is for the game. Understanding these attributes will also make sure that the user can overcome the errors such as failed to detect location 12 GPS joystick 2019.
i. Physical World Attribute
The best part of this attribute is that it is the center of the user experience of the game. The second part is the fact that this map has evolved and there are no shortcuts to its success. Ingress was the previous game that was developed by Niantic and the crowdsourcing of this map started with the evolution of this application. This was developed by the same team that is working on the core of Google Earth.
ii. Real World Gestures
The augmented reality is another important aspect that is related to Pokemon Go and this also means that the location services are relied on when it comes to this application. The android and the iOS location services are continuously used by the game to provide the pinpoint locations as well as the game features that are not found in other applications. The use of location through GPS satellites even becomes more important for such gestures. Especially when the player is outdoors it becomes too important to deal with using GPS location.
iii. Place Attribution
The system within the system that has been designed by the game developers makes sure that the location inaccuracies are accounted for. This also means that the 4-meter accuracy of the GPS is further enhanced to deal with the perfect location identification of each player.
Part 2: Ways to Fix Error 12 on Pokémon Go
Several ways can be used to make sure that the subject error is resolved with ease. This section of the article will deal with all such ways that can be used to get the work done with ease and perfection.
Method 1: Enable Mock Locations
As the name suggests it is to set the fake location using the build-in iPhone feature. It will also make sure that the feature of the game continues to work perfectly.
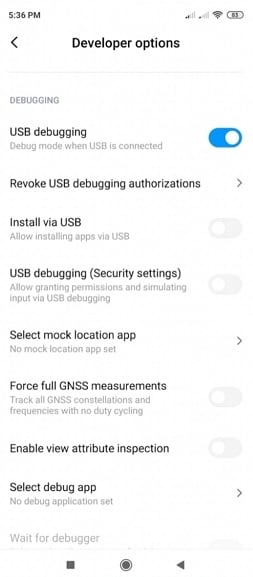
Step 1. Go to the developer options of your device. To get to the developer options simply head over to the settings > About Phone > Software Info > Build number and tap it 7 times to enable the mock locations.
Step 2. Install the Fake GPS that is a free application and can easily be found on the Play Store.
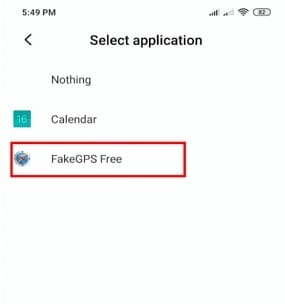
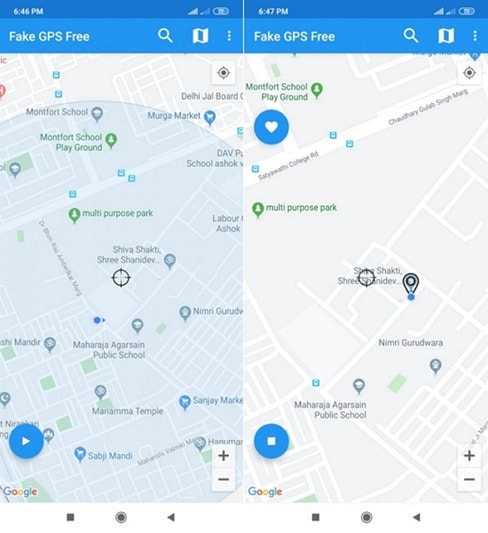
Step 3. Launch the application and you can easily enjoy Pokémon Go without any hassle and trouble and resolve the Pokémon go failed to detect location 12 fake GPS error.
Method 2: Location Activation
This is another important and easy way to make sure that the Pokémon failed to detect location 12 error is resolved with ease and perfection. To execute the process the steps are mentioned as follows:
Step 1. Open the settings on your Phone to start with:
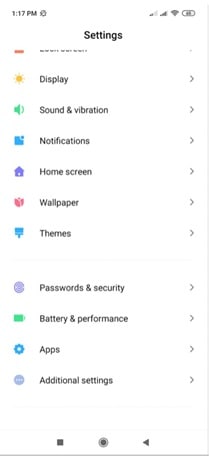
Step 2. Tap on the passwords and security to proceed with the process:
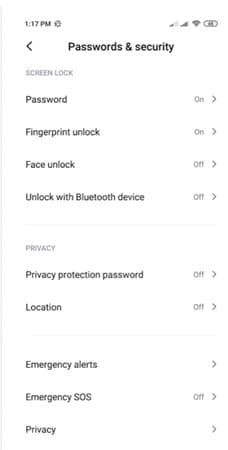
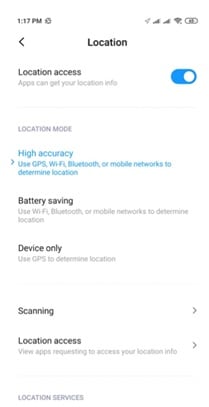
Step 3. Tap to turn on the location to finish the process and eliminate the failed to detect location 12 Pokémon Go errors.
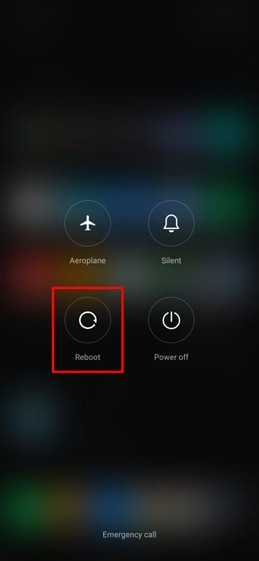
Method 3: Reboot the Poco F5 Pro 5G device
This might seems weird but this trick has been working to quiet some time now and has been proven to eliminate the failed location 12 Pokémon Go issue. There is a possibility that the server location is not synced with the Poco F5 Pro 5G device. Restarting the Poco F5 Pro 5G device will make sure that both the locations are sync and the problem is resolved with ease.
Just long-press the power button and choose the reboot option from the menu that appears to complete the process in full.
Part 3: Best Way to Overcome Location Error 12 on Pokémon Go for iOS Devices
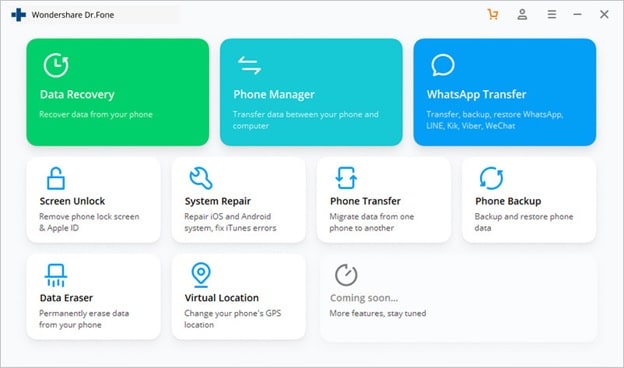
Dr. Fone Virtual location is the best tool to overcome issues such as failure to detect location 12 Pokémon go on iPhone. The program has been designed to make sure that the GPS location is spoofed and you get the perfect outcome in resolving the error under discussion.
The Process
Step 1: Program Installation
To begin the process, download and install the program to get going with the process.

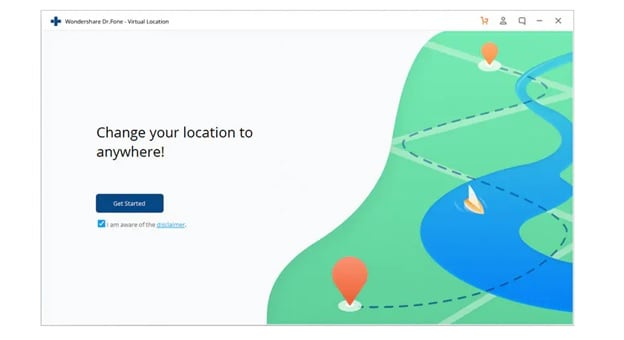
Step 2: Enable Virtual Location
Connect your iPhone and enable virtual location from the options of the program. Hit get started to begin the spoof.

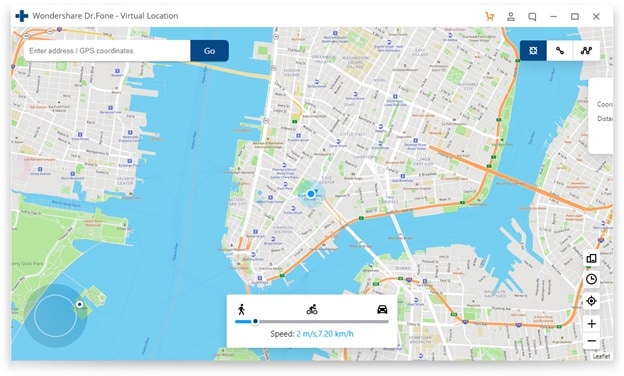
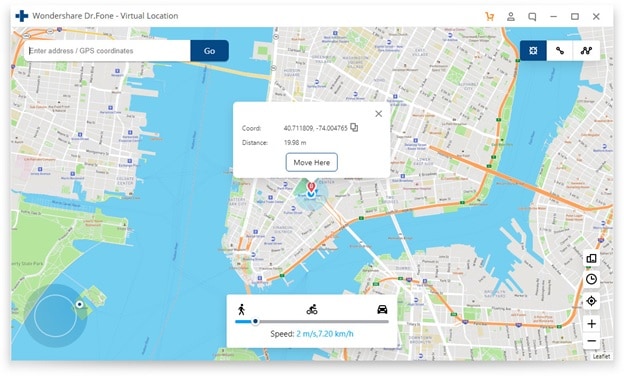
Step 3: Locate yourself
The center on the button on the next screen is to be clicked to get the accurate location.

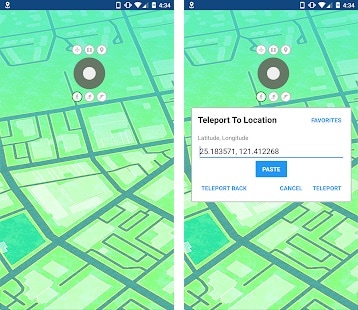
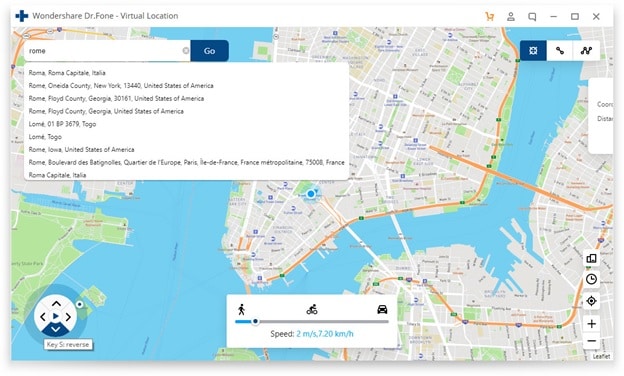
Step 4: Teleportation
On the upper right corner click the icon on the third to begin teleportation or spoofing to be precise. Enter the name of the place where you want to teleport to.

Step 5: Move to the teleported location
Click on move here and the system will move you to the location that has been entered.

Step 6: Validate and Completion
The location will be locked by the program and your iPhone will also show the same location as on Dr. Fone. This also completes the process in full:

Conclusion
Dr.Fone - Virtual Location is the best and the state-of-the-art program to overcome Pokémon go unable to detect location 12 on iOS devices. It has an intuitive interface and it also allows the users to overcome the issues that traditional spoofing programs present. It is being updated constantly which also means that you will be able to get the best results. There is no program on the internet that can resolve the error that failed to detect location 12 in Pokémon go as easily as this one does.
How to use Pokemon Go Joystick on Poco F5 Pro 5G?
Pokemon Go is one of the most popular augmented reality location-based games that let us catch Pokemons and complete tons of other tasks. Needless to say, there are times when players are not able to go outside to catch Pokemons due to all kinds of reasons. The good news is that you can still play your favorite game using a Pokemon Go joystick. To help you, I will let you know how to fake GPS in Pokemon Go using 3 reliable methods in this post.
Part 1: What’s the Need for a Pokemon Go Joystick?
If you are an avid Pokemon Go player, then you might already know that the game demands us to step outside to catch Pokemons or participate in raids. Sadly, not everyone can travel so much on their own. Therefore, you might consider using a Pokemon Go joystick on iOS/Android under the following circumstances.
- In the current Covid-19 pandemic, you might be under a lockdown and can’t step out.
- You could have already explored your nearby areas and would like to catch more Pokemons.
- There could be any other health or environmental condition, stopping you from going out.
- The weather outside might not be suitable or safe to explore the Pokemon Go map on your own.
- Any other possible reason for not being able to travel solely or having enough time to catch Pokemons.
Part 2: Possible Risks for Using a Pokemon Go Joystick
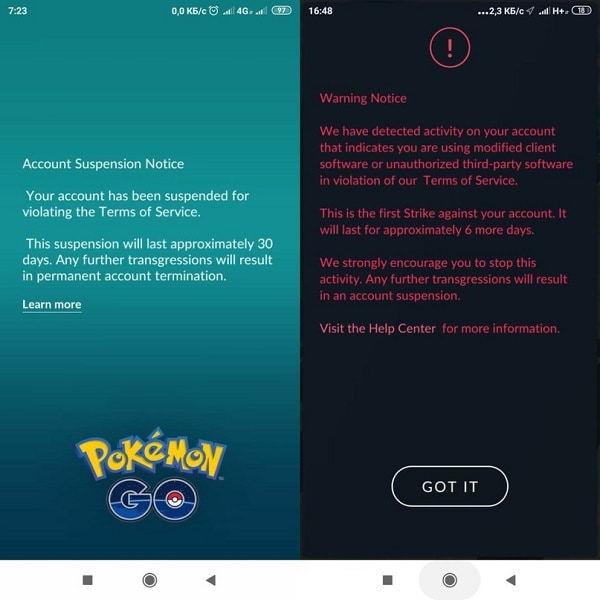
A Pokemon Go spoofing iOS/Android solution can easily change your present location in the game or even simulate your movement. Though, if you use the Pokemon Go joystick app multiple times a day and Niantic detects it, then it can cause some issues.
Please note that the use of any location spoofing or Pokemon Go hack (joystick) is against the terms of Niantic. Therefore, if your account is found using these hacks, then Niantic can display warning messages. If after getting multiple warnings, the hack is still being detected, then it can lead to a temporary or even a permanent ban of your account.
Part 3: How to Fake GPS in Pokemon Go: 3 Foolproof Solutions
Out of all the Pokemon Go joystick and location spoofing solutions, I would recommend trying the following tools.
3.1 Pokemon Go Joystick for iOS (No Jailbreak Needed)
If you are looking for a Pokemon Go spoofing iOS solution, then just give Dr. Fone - Virtual Location (iOS) a try. Without the need for jailbreaking your device, you can spoof your iPhone’s location to anywhere you like. The application can also be used to simulate its movement between multiple spots at a preferred speed.
Besides that, you can also mark any location as favorite or even import/export GPX files using Dr.Fone – Virtual Location. Since the application is extremely easy to use, you don’t have to go through any technical hassle to implement this Pokemon Go joystick iOS solution.
Step 1: Connect your iPhone and launch the application
Firstly, you can just connect your iOS device to the computer and launch Dr.Fone – Virtual Location application. You can agree to its terms of services and click on the “Get Started” button now.
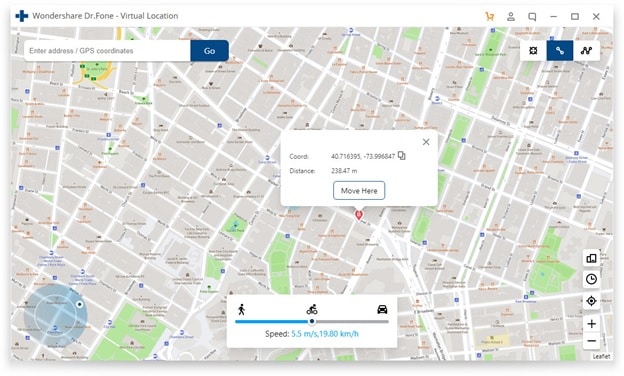
Step 2: Spoof your iPhone Location to Anywhere you want
Once your iPhone is connected, its present location would automatically be displayed on the screen. To spoof the Pokemon Go location on iOS, select the “Teleport Mode” option and enter the target location’s address/name/coordinates on the search bar.
Afterward, you can select the target location and the interface would automatically load it. You can now move the pin around and even zoom in/out the map to get the desired spot. Lastly, click on the “Move Here” button to spoof the fake GPS on Pokemon Go.
Step 3: Simulate the iPhone Movement with a joystick
To use the Pokemon Go joystick iOS solution, you can select the One-stop or Multi-stop mode from the top. Now, you can drop the pins on the map as per your requirements to set up a route to cover.

Afterward, you can enter the number of times you want to cover the route and even set up a preferred speed. Lastly, click on the “March” button to start the simulation on the map. You can also use a joystick at the bottom to move around realistically on Pokemon Go.

Video Guide: Teleport to anywhere in the world!
3.2 Use a Pokemon Go Joystick APK for Android Devices
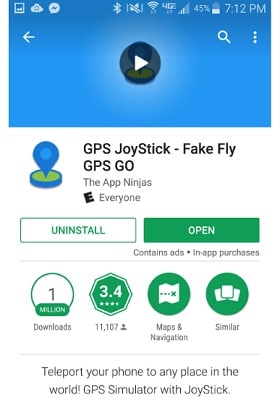
Just like iPhone, Android device owners can also implement these Pokemon Go hacks for location spoofing. From all the available options, you can consider using GPS Joystick by App Ninjas. As the name suggests, the app will enable a GPS joystick that you can use to simulate the movement of your device. It will let you fake GPS on Pokemon Go by entering the target coordinates or its address.
Step 1: Install the Pokemon Go Spoofer APK
To start with, you can just go to the Play Store page of the GPS Joystick app and install it on your device. Later, you can enable the Developer Options on the phone by going to its Settings > About Phone and tapping the “Build Number” field 7 times.
Afterward, go to its Settings > Developer Options and set the Pokemon Go spoofer APK the default mock location app.
Step 2: Set up the preferences to fake GPS on Pokemon Go
Great! Now all you need to do is launch the GPS Joystick app and go to its Settings to spoof your location. Here, you can enter the exact coordinates of the target location to spoof.
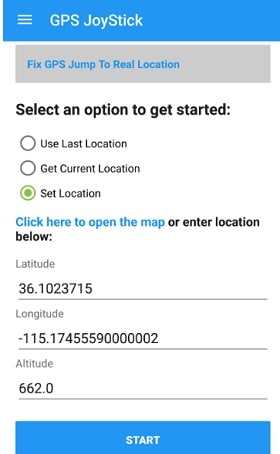
Besides that, you can also tap on the map option to directly enter the address or the name of the target location.

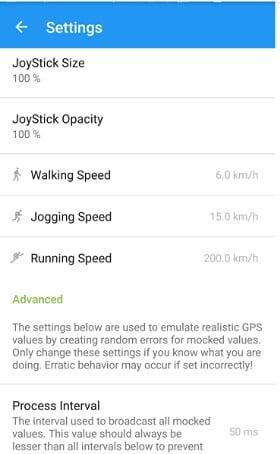
You can further visit the GPS Joystick settings to set up preferred walking, jogging, or running speeds for the simulated movement.
Step 3: Start simulating the movement on your Android
That’s it! Now, you can just view the GPS Joystick on the map with relevant options. You can start/stop the simulation as per your requirements and even directly enter the coordinates to fake GPS on Pokemon Go.
3.3 Pokemon Go Joystick Hack for Rooted Android Phones
Lastly, if you have a rooted Android device, then you can also explore tons of options to fake GPS on Pokemon Go. One of them FGL Pro, which is mostly used by experts for location spoofing and movement simulation. Since the Pokemon Go APK download is available for free, you can use the app without any issue. Here’s how you can use this Pokemon Go APK for rooted devices.
Step 1: Install the Pokemon Go Spoofer APK
At first, make sure that your Poco F5 Pro 5G is rooted before you install this Pokemon Go APK hack. Later, you can go to its website or any third-party installer to get the location spoofer app.
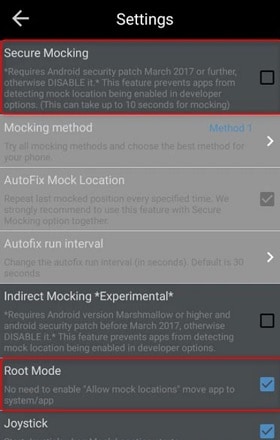
You can now launch the application and go to its Settings to enable the Root Mode. Also, make it the default mock location app by visiting the Developer Option on your phone.
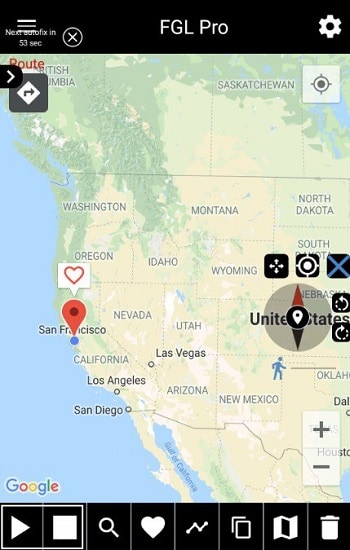
Step 2: Start Simulating the movement of your Poco F5 Pro 5G
Great! Now, you can just launch the FGL Pro app on your phone and tap on the search icon to look for the target location. You can now adjust the location on the map and tap on the Start icon. There will be a GPS joystick location on the map that would let you simulate your movement accordingly on the map.
Part 4: Tips to Avoid your Pokemon Go Account from Getting Banned
If you want to avoid getting your account banned and still use a reliable spoofing app for Pokemon Go, then consider the following tips:
Try not to overly use the Pokemon Go joystick app all the time. It is recommended to use these apps 2-3 times a day only.
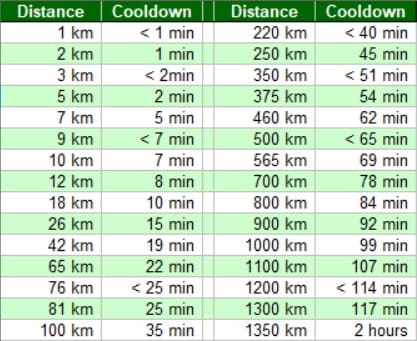
Always consider the cooldown duration in mind before changing your location. For instance, avoid using the app for a while before moving from one place to another. If you move from London to Tokyo to New York the same day, then your account might get flagged.
Try to spoof your location in the same district or state first and wait for a few hours before changing your whereabouts. The following cooldown duration chart would help you determine this in advance.

Make sure that the Pokemon Go joystick you are using is a reliable solution (like the ones listed above).
If you have already got a warning on your Pokemon Go account, then consider creating another account for using any fake GPS Pokemon Go hack instead.
There you go! By now, you would be able to implement these spoofing Pokemon Go tips and tricks. As you can see, there can be so many Pokemon Go spoofing iOS/Android solutions that you can explore. While there are plenty of Pokemon Go spoofer APK tools for Android devices, iOS users can try Dr. Fone - Virtual Location (iOS) . Without the need for jailbreaking your device, it will let you spoof its location and even simulate its movement to catch Pokemons remotely.
All You Need To Know About Mega Greninja For Poco F5 Pro 5G
Are you a fan of Pokemon Go? Then, you will find this article not only useful but also quite interesting. In case you have never played this game before, then you should know that Pokemon Go is a fantastic augmented reality game.
It requires the use of GPS (Global Positioning System) to track your location. Basically, Pokemon Go is a mobile application which you can easily download from Google Play Store or App Store, and it’s absolutely free. In simple words, you can say that Pokemon Go makes use of mapping technology so as to plot your actual location as you roam around in the streets to catch your favourite Pokemon.
When you play the game, your main goal would be to catch as many Pokemon or fictional characters as you can. Your main task will be to battle your opponents to catch the Pokemon and then train them.
It’s worth mentioning here that this AR-game is absolutely convenient to play. Now, one of the most amazing features that have been added to this game is Mega Evolution. But, unfortunately if you were of the opinion that greninja can mega evolve, then you are completely wrong, in fact you should note that no Kalos pokemon can mega evolve.
Through this article, we will discuss all you need to know about Greninja. So, without any further delay, let’s get started.
Part 1: Who is Mega greninja?

Also, called the Ninja Pokemon, Greninja is Dark/ Water-type pokemon. Some people love to call it a frog-like master. One of the most amazing features of Greninja pokemon is that with its swift movements, you will notice that this pokemon succeeds in confusing its opponents.
It makes use of very sharp throwing stars to slice its enemies. It features Torrent ability.
There are various weaknesses of this pokemon which include “Fighting”, “Grass”, “Electric”, “Bug”, and “Fairy”.Its worth mentioning here that Greninja pokemon is the final evolution of Froakie.
Part 2: What are the Strengths of Greninja in Pokemon?

Greninja is resistant to “Water”, “Fire”, “Ice”, “Dark”, “Steel” and finally “Ghost”. Also, this pokemon is immune to “Psychic”. This pokemon’s presence can be very intimidating for its opponents, it would not be wrong if we say that Greninja is quite unpredictable. There is no doubt that the counter attacks of Greniaja prove to be very dangerous for its enemies.
Part 3: How to Catch Greninja?

In order to catch Greninja, you will be required to fulfill specific requirements in the Pokemon Sun and Moon Exclusive demo.
First of all, after launching the Pokemon Sun and Moon Demo, go to the Pokemon Center.
Then, you’ll meet Professor Kukui and when he starts talking to you and asks what you wish to do , choose the option of “bring to full version.After that, you will be required to choose Ash-Greninja. Then, open the full game, finally you have to enter the nearest Pokémon Center.
Catching your favourite Pokemon or to mega evolve a specific pokemon will require you to go to different places or explore different locations, but it’s not always possible to step out of your house, it might be raining, or its night time, in the case, we recommend using software called Dr.Fone(Virtual Location).
With the help of this amazing software, you can teleport to any location or place in the whole without even requiring you to step out of your house.
In order to get started with Dr.Fone, you need to download Dr.Fone(Virtual Location) iOS. Then, you have to install Dr.fone on your smartphone. Finally, you have to launch Dr.Fone (Virtual Location) on your device.
Step 1: You have to tap on “Virtual Location” among the various options that you will notice therein. It’s important to ensure that when you are setting up Dr.Fone on your device, always ensure that your iPhone is connected to the PC. Then, click on “Get Started”.
Step 2: If you have executed the prior steps or directions successfully, then you will see a new window that shows your actual location on a map will get displayed on your screen. Now, make sure that your displayed location on moa is accurate, if not, then click on “Center On,” with the help of this, you’ll be able to make your location correct.
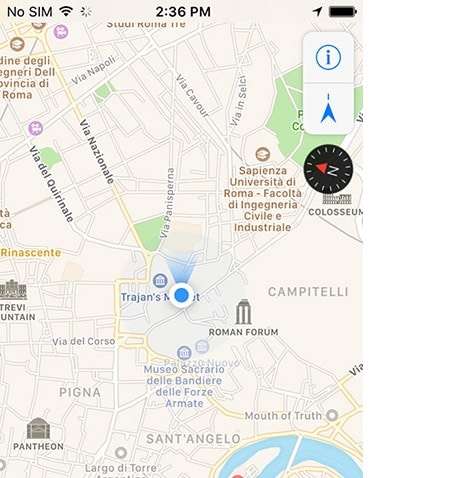
Step 3: After all the previous steps, the next step is to click on the “teleport mode” icon, which will be located in the upper-right part. This will activate the teleport mode. After that, you have to enter the name of the location or place where you wish to teleport to in the upper left field. Finally, tap on “Go”. As an example, we are going to enter “Italy”, Rome in the left field.
Step 4: In this manner, your location will now be understood or set by the system to “Italy”. You’ll see a pop-up box; you have to just click on “Move On”.
Step 5: If you have followed the directions accurately, your actual location on the map will now be set to “Italy”. You can confirm your location from the Pokemon Go’s map. Finally, below we have provided a screenshot of how the location will be shown.
Step 6: Also, you’ll see that the location on your iPhone would have also changed now to “Italy” or any other place that you have entered earlier.
Conclusion
So, we have reached the end of this article. We hope that you found the article quite useful as well as insightful. We also hope that with the help of the setup guide for Dr.Fone you can now easily catch your favourite pokemon by teleporting to different locations across the world. If you have any doubts or suggestions related to this article, then feel free to write it down in the comment section. So, this was all from our side for now. Stay Tuned
Also read:
- [New] 2024 Approved Elite EasyTime Timer Service for Free
- [New] Effortless, No-Cost Screening of Android Gadgets for 2024
- 2024 Approved Identifying Premium Free Online Tools for Efficient SRT Translations
- Can I use iTools gpx file to catch the rare Pokemon On Poco C50 | Dr.fone
- Changing Landscapes in Academia: Is Technology Replacing Student Essays?
- Here Are Some Reliable Ways to Get Pokemon Go Friend Codes For Google Pixel Fold | Dr.fone
- How PGSharp Save You from Ban While Spoofing Pokemon Go On Nubia Red Magic 9 Pro+? | Dr.fone
- How to Exit Android Factory Mode On Vivo T2 Pro 5G? | Dr.fone
- In 2024, 3 Facts You Need to Know about Screen Mirroring Vivo X100 Pro | Dr.fone
- In 2024, How Can I Create My Pokemon Overworld Maps On Apple iPhone 15 Pro? | Dr.fone
- In 2024, How to Fix Pokemon Go Route Not Working On Realme Narzo 60 Pro 5G? | Dr.fone
- In 2024, Prodigious Picture Editing Speedy Steps for Windows Photo App Users
- Planning to Use a Pokemon Go Joystick on Nubia Z50S Pro? | Dr.fone
- Unova Stone Pokémon Go Evolution List and How Catch Them For Poco F5 Pro 5G | Dr.fone
- Title: In 2024, Pokemon Go Error 12 Failed to Detect Location On Poco F5 Pro 5G? | Dr.fone
- Author: Elizabeth
- Created at : 2024-12-04 21:18:31
- Updated at : 2024-12-12 02:22:23
- Link: https://pokemon-go-android.techidaily.com/in-2024-pokemon-go-error-12-failed-to-detect-location-on-poco-f5-pro-5g-drfone-by-drfone-virtual-android/
- License: This work is licensed under CC BY-NC-SA 4.0.