
In 2024, All You Need To Know About Mega Greninja For Honor X8b | Dr.fone
All You Need To Know About Mega Greninja For Honor X8b
Are you a fan of Pokemon Go? Then, you will find this article not only useful but also quite interesting. In case you have never played this game before, then you should know that Pokemon Go is a fantastic augmented reality game.
It requires the use of GPS (Global Positioning System) to track your location. Basically, Pokemon Go is a mobile application which you can easily download from Google Play Store or App Store, and it’s absolutely free. In simple words, you can say that Pokemon Go makes use of mapping technology so as to plot your actual location as you roam around in the streets to catch your favourite Pokemon.
When you play the game, your main goal would be to catch as many Pokemon or fictional characters as you can. Your main task will be to battle your opponents to catch the Pokemon and then train them.
It’s worth mentioning here that this AR-game is absolutely convenient to play. Now, one of the most amazing features that have been added to this game is Mega Evolution. But, unfortunately if you were of the opinion that greninja can mega evolve, then you are completely wrong, in fact you should note that no Kalos pokemon can mega evolve.
Through this article, we will discuss all you need to know about Greninja. So, without any further delay, let’s get started.
Part 1: Who is Mega greninja?

Also, called the Ninja Pokemon, Greninja is Dark/ Water-type pokemon. Some people love to call it a frog-like master. One of the most amazing features of Greninja pokemon is that with its swift movements, you will notice that this pokemon succeeds in confusing its opponents.
It makes use of very sharp throwing stars to slice its enemies. It features Torrent ability.
There are various weaknesses of this pokemon which include “Fighting”, “Grass”, “Electric”, “Bug”, and “Fairy”.Its worth mentioning here that Greninja pokemon is the final evolution of Froakie.
Part 2: What are the Strengths of Greninja in Pokemon?

Greninja is resistant to “Water”, “Fire”, “Ice”, “Dark”, “Steel” and finally “Ghost”. Also, this pokemon is immune to “Psychic”. This pokemon’s presence can be very intimidating for its opponents, it would not be wrong if we say that Greninja is quite unpredictable. There is no doubt that the counter attacks of Greniaja prove to be very dangerous for its enemies.
Part 3: How to Catch Greninja?

In order to catch Greninja, you will be required to fulfill specific requirements in the Pokemon Sun and Moon Exclusive demo.
First of all, after launching the Pokemon Sun and Moon Demo, go to the Pokemon Center.
Then, you’ll meet Professor Kukui and when he starts talking to you and asks what you wish to do , choose the option of “bring to full version.After that, you will be required to choose Ash-Greninja. Then, open the full game, finally you have to enter the nearest Pokémon Center.
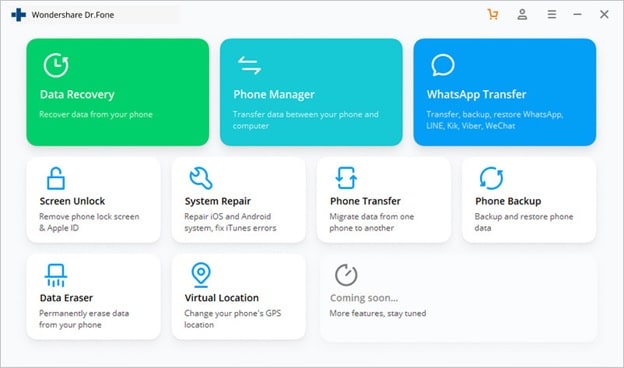
Catching your favourite Pokemon or to mega evolve a specific pokemon will require you to go to different places or explore different locations, but it’s not always possible to step out of your house, it might be raining, or its night time, in the case, we recommend using software called Dr.Fone(Virtual Location).
With the help of this amazing software, you can teleport to any location or place in the whole without even requiring you to step out of your house.
In order to get started with Dr.Fone, you need to download Dr.Fone(Virtual Location) iOS. Then, you have to install Dr.fone on your smartphone. Finally, you have to launch Dr.Fone (Virtual Location) on your device.
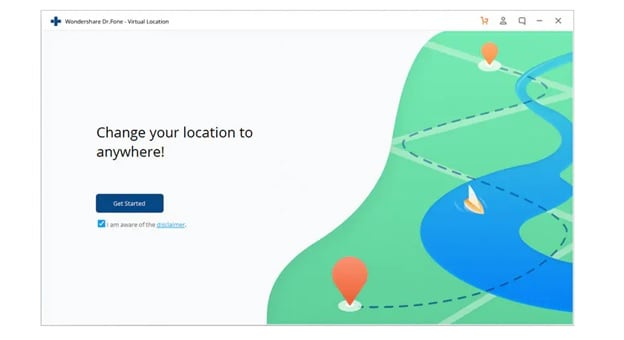
Step 1: You have to tap on “Virtual Location” among the various options that you will notice therein. It’s important to ensure that when you are setting up Dr.Fone on your device, always ensure that your iPhone is connected to the PC. Then, click on “Get Started”.
Step 2: If you have executed the prior steps or directions successfully, then you will see a new window that shows your actual location on a map will get displayed on your screen. Now, make sure that your displayed location on moa is accurate, if not, then click on “Center On,” with the help of this, you’ll be able to make your location correct.
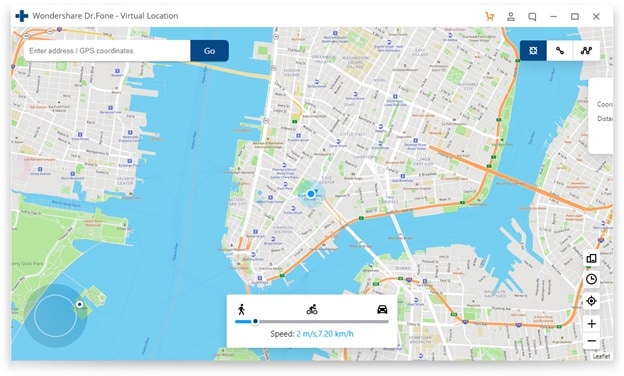
Step 3: After all the previous steps, the next step is to click on the “teleport mode” icon, which will be located in the upper-right part. This will activate the teleport mode. After that, you have to enter the name of the location or place where you wish to teleport to in the upper left field. Finally, tap on “Go”. As an example, we are going to enter “Italy”, Rome in the left field.
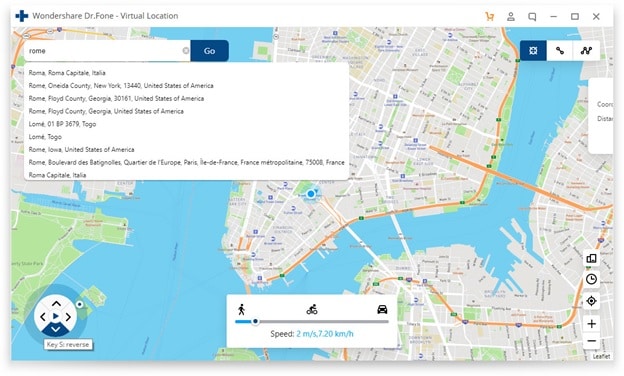
Step 4: In this manner, your location will now be understood or set by the system to “Italy”. You’ll see a pop-up box; you have to just click on “Move On”.
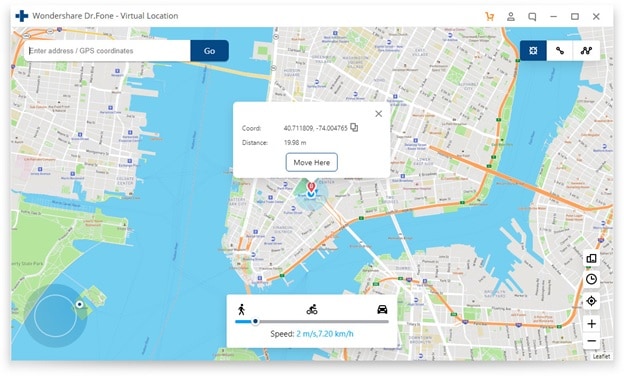
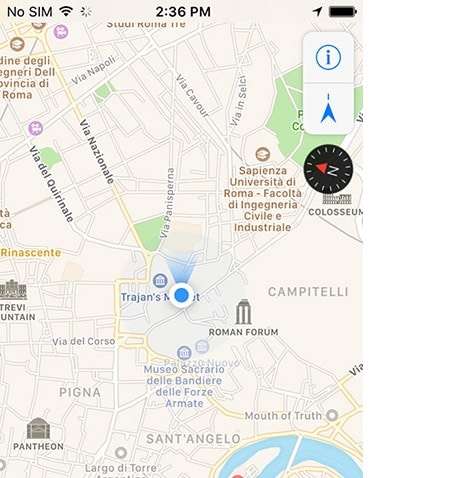
Step 5: If you have followed the directions accurately, your actual location on the map will now be set to “Italy”. You can confirm your location from the Pokemon Go’s map. Finally, below we have provided a screenshot of how the location will be shown.
Step 6: Also, you’ll see that the location on your iPhone would have also changed now to “Italy” or any other place that you have entered earlier.
Conclusion
So, we have reached the end of this article. We hope that you found the article quite useful as well as insightful. We also hope that with the help of the setup guide for Dr.Fone you can now easily catch your favourite pokemon by teleporting to different locations across the world. If you have any doubts or suggestions related to this article, then feel free to write it down in the comment section. So, this was all from our side for now. Stay Tuned
How to use iSpoofer on Honor X8b?
iSpoofer is a location spoofer that allows you to change your location on your device. This is useful for games like Pokemon Go, where you can catch Pokemons from different regions without leaving your home. However, iSpoofer is not available for download anymore. If you are looking for an alternative to iSpoofer, you can use Dr.Fone Virtual Location. Here’s how you can use Dr.Fone Virtual Location to spoof your location on your Honor X8b.

iSpoofer is one of the most useful tools for iOS users, that’s designed to simulate a user’s GPS location. With iSpoofer, you can change your current location to anywhere in the world and access geo-restricted content without any hassle. While the tool has several real-world applications, the majority of users use iSpoofer to fake their location to catch rare Pokemon in Pokemon Go.
Since iSpoofer is an extremely reliable app, even Android users want to know if they can use it on their smartphones or not. If you’re one of them, this guide will help. In today’s article, we are going to discuss if you can download iSpoofer for Android or not and what are some of the best solutions to fake GPS location on an Android device.
So, without any further ado, let’s get started.
Part 1: Can I download the iSpoofer on Android
Unfortunately, iSpoofer isn’t available for Android. It’s an exclusive geo spoofing app that only works on iOS devices. In fact, all its features are tailored for the iOS ecosystem only. So, if you have an Android device, you won’t be able to download iSpoofer for Android at all.
However, the good news is that you don’t need iSpoofer to fake GPS location on an Android smartphone. There are dozens of Android-specific location spoofing apps that’ll help you simulate the GPS location and play Pokemon Go with a fake location. Some of these tools also come with a dedicated GPS Joystick feature, which means you’ll also be able to control your movement while sitting at one spot.
Part 2: Common ways to spoof on Android
When it comes to choosing the right location spoofing methods for Android, you’ll have to be extra cautious. Why? Because there are many fake GPS apps on Android that aren’t reliable and may damage your smartphone’s overall functionality as well.
Here are some of the most common ways to spoof location on Android devices.
- Use VMOS
VMOS is an application that lets users set up a virtual machine on their Android device. This means that you’ll be able to set up two different Android systems on the same device. What makes VMOS the right tool for geo spoofing on Android is the fact that it offers a one-click root enable feature. You can easily root your virtual Android OS without damaging the firmware of the primary OS. This way you’ll be able to install professional location spoofing tools and change your GPS location without any hassle.

The only downside of using VMOS is that it’s extremely hard to set up and manage. First and foremost, you’ll need different tools to successfully set up the virtual OS on your device. Secondly, VMOS is heavy software and if your smartphone doesn’t have decent configurations, it may even slow down the overall processing.
- Root Your Device
Another way to fake location on Android is to root your device. Rooting an Android device will allow you to install third-party spoofing apps that offer extensive functionality. However, when you’ll root your device, you won’t be able to claim its warranty anymore. So, in case you don’t want to void your smartphone’s warranty, ‘rooting’ may not be the right solution to fake your location in Pokemon Go.
- Use PGSharp
PGSharp is one of the best alternatives to iSpoofer for Android. It’s a tweaked version of the original Pokemon Go app that comes with a few additional features such as spoofing and GPS Joystick. The best part about using PGSharp is that it’s compatible with all Android devices. You won’t have to root your device to install and run PGSharp.

You can either choose the free or the paid version of the app. Of course, the latter comes with a few additional features, but if you only want to fake location in Pokemon Go, the free version of PGSharp will get the job done as well.
Note: Keep in mind that PGSharp isn’t available on Google Play Store and you’ll have to download it from the official PGSharp website.
Extension: safest way to spoof on iOS- Dr.Fone virtual location
So, that’s how you can fake GPS location on an Android device and collect different types of Pokemon in Pokemon Go. Even though iSPoofer isn’t available for Android, you can still use the above three methods to mock location without any effort.
It’s also worth noting that iSpoofer is permanently shut down and you can no longer install it on iOS devices as well. Even the iSpoofer website is down and if you want to fake location on your iPhone/iPad, you’ll have to look for other options. One of the best ways to change GPS location on an iOS device is to use Dr.Fone - Virtual Location (iOS). It’s a professional geo spoofing tool for iOS that comes with a wide variety of features to mock location on Honor X8bs.
It has a dedicated “Teleport Mode” that’ll allow you to change your current location to anywhere in the world. You can even set a fake location using its GPS coordinates. Like iSpoofer, Dr.Fone - Virtual Location (iOS) also comes with the GPS Joystick feature. This means you’ll be able to catch different types of Pokemon without moving at all.
Here are a few key features of Dr.Fone - Virtual Location (iOS).
- Change your current location with a single click
- Use GPS coordinates to find locations
- Virtually control your GPS movement using the Joystick feature
- Customize your movement speed while walking in different directions
- Compatible with all iOS versions
Follow these steps to change your GPS location on an iDevice using Dr.Fone - Virtual Location (iOS).
Step 1 - Install the Dr.Fone toolkit on your computer and launch the software. Click “Virtual Location” and connect your iPhone to the computer using a lightning cable.

Step 2 - Once the tool recognizes your device, click “Get Started” to proceed further.

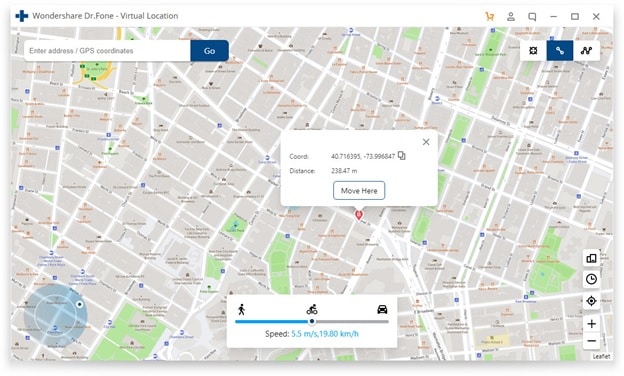
Step 3 - You’ll be prompted to a map that’ll point to your current location. Select “Teleport Mode” from the top-right corner and use the search bar to find the desired location.

Step 4 - The pointer will move to the selected location automatically. Finally, click “Move Here” to set it as your new location.

That’s how you can change GPS location on an iPhone/iPad using Dr.Fone - Virtual Location (iOS).
Pokemon Go Error 12 Failed to Detect Location On Honor X8b?
Pokemon Go is a popular game that has taken the world by storm. It is an augmented reality game that allows players to catch Pokemon in the real world using their smartphones. However, many players have reported encountering the “Failed to detect location (12)” error while playing the game. This error can be frustrating as it prevents players from playing the game properly. In this article, we will discuss what causes the “Failed to detect location (12)” error in Pokemon Go and how you can fix it on your Honor X8b.
Pokémon Go has been on the nerves of its players and this is all because of the AR notion that it presents. The failed to detect location 12 is one of the most common errors that are faced by the players while playing this game. You might not believe but the GPS signals and the location settings on iPhone or Android are the two main reasons for this error. It can be resolved with ease and this article has been written to get the work done with ease. Applying the methods explained will ensure that you get the best results overall.
Part 1: Why is Location Important in Pokémon Go?
The best part of this game is that it has been compiled keeping in view the location mechanics. The location analytics of the game has made sure that it becomes the overnight sensation. Three main attributes are associated with the location framework of the game. These attributes also show how important the location is for the game. Understanding these attributes will also make sure that the user can overcome the errors such as failed to detect location 12 GPS joystick 2019.
i. Physical World Attribute
The best part of this attribute is that it is the center of the user experience of the game. The second part is the fact that this map has evolved and there are no shortcuts to its success. Ingress was the previous game that was developed by Niantic and the crowdsourcing of this map started with the evolution of this application. This was developed by the same team that is working on the core of Google Earth.
ii. Real World Gestures
The augmented reality is another important aspect that is related to Pokemon Go and this also means that the location services are relied on when it comes to this application. The android and the iOS location services are continuously used by the game to provide the pinpoint locations as well as the game features that are not found in other applications. The use of location through GPS satellites even becomes more important for such gestures. Especially when the player is outdoors it becomes too important to deal with using GPS location.
iii. Place Attribution
The system within the system that has been designed by the game developers makes sure that the location inaccuracies are accounted for. This also means that the 4-meter accuracy of the GPS is further enhanced to deal with the perfect location identification of each player.
Part 2: Ways to Fix Error 12 on Pokémon Go
Several ways can be used to make sure that the subject error is resolved with ease. This section of the article will deal with all such ways that can be used to get the work done with ease and perfection.
Method 1: Enable Mock Locations
As the name suggests it is to set the fake location using the build-in iPhone feature. It will also make sure that the feature of the game continues to work perfectly.
Step 1. Go to the developer options of your device. To get to the developer options simply head over to the settings > About Phone > Software Info > Build number and tap it 7 times to enable the mock locations.
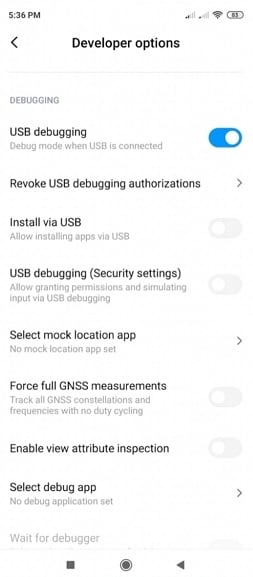
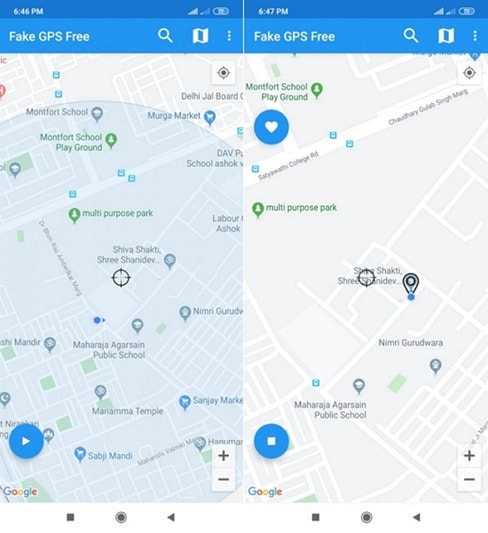
Step 2. Install the Fake GPS that is a free application and can easily be found on the Play Store.
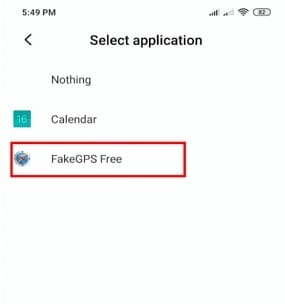
Step 3. Launch the application and you can easily enjoy Pokémon Go without any hassle and trouble and resolve the Pokémon go failed to detect location 12 fake GPS error.
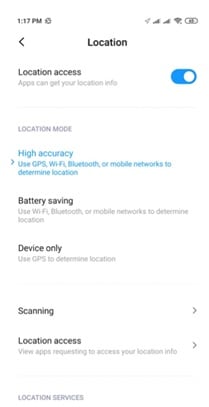
Method 2: Location Activation
This is another important and easy way to make sure that the Pokémon failed to detect location 12 error is resolved with ease and perfection. To execute the process the steps are mentioned as follows:
Step 1. Open the settings on your Phone to start with:
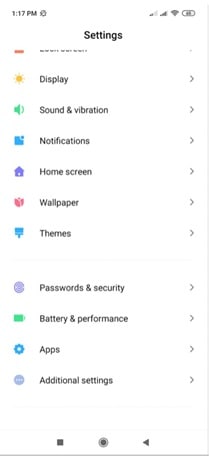
Step 2. Tap on the passwords and security to proceed with the process:
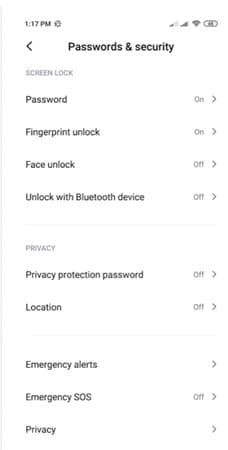
Step 3. Tap to turn on the location to finish the process and eliminate the failed to detect location 12 Pokémon Go errors.
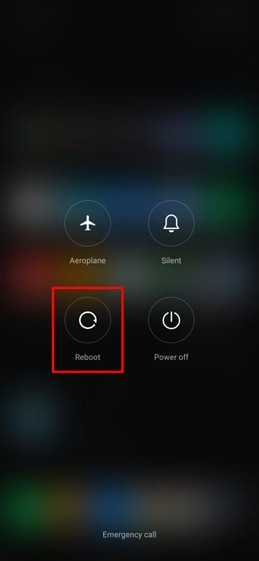
Method 3: Reboot the Honor X8b device
This might seems weird but this trick has been working to quiet some time now and has been proven to eliminate the failed location 12 Pokémon Go issue. There is a possibility that the server location is not synced with the Honor X8b device. Restarting the Honor X8b device will make sure that both the locations are sync and the problem is resolved with ease.
Just long-press the power button and choose the reboot option from the menu that appears to complete the process in full.
Part 3: Best Way to Overcome Location Error 12 on Pokémon Go for iOS Devices
Dr. Fone Virtual location is the best tool to overcome issues such as failure to detect location 12 Pokémon go on iPhone. The program has been designed to make sure that the GPS location is spoofed and you get the perfect outcome in resolving the error under discussion.
The Process
Step 1: Program Installation
To begin the process, download and install the program to get going with the process.
Step 2: Enable Virtual Location
Connect your iPhone and enable virtual location from the options of the program. Hit get started to begin the spoof.
Step 3: Locate yourself
The center on the button on the next screen is to be clicked to get the accurate location.

Step 4: Teleportation
On the upper right corner click the icon on the third to begin teleportation or spoofing to be precise. Enter the name of the place where you want to teleport to.
Step 5: Move to the teleported location
Click on move here and the system will move you to the location that has been entered.
Step 6: Validate and Completion
The location will be locked by the program and your iPhone will also show the same location as on Dr. Fone. This also completes the process in full:

Conclusion
Dr.Fone - Virtual Location is the best and the state-of-the-art program to overcome Pokémon go unable to detect location 12 on iOS devices. It has an intuitive interface and it also allows the users to overcome the issues that traditional spoofing programs present. It is being updated constantly which also means that you will be able to get the best results. There is no program on the internet that can resolve the error that failed to detect location 12 in Pokémon go as easily as this one does.
Also read:
- [New] 2024 Approved End-to-End Camera Rotation Explained
- [New] Sync Your Style Across iOS and Android with a Customized WhatsApp Sound
- [Updated] Club Anthems Expertly Curated DJ Vids Downloads
- A Working Guide For Pachirisu Pokemon Go Map On Nubia Red Magic 9 Pro+ | Dr.fone
- Chromebook Nightmare: Repeatedly Troubled by Bedbug Infestations in School Computers | ZDNet
- Detailed guide of ispoofer for pogo installation On Poco C51 | Dr.fone
- Elevating Engagement Tips to Share Your Screen on Facebook Lives for 2024
- Guide to Dispelling .NET Runtime Errors in OS
- In 2024, 3 Ways for Android Pokemon Go Spoofing On Honor 90 Pro | Dr.fone
- In 2024, Best Pokemons for PVP Matches in Pokemon Go For Honor 90 | Dr.fone
- In 2024, How PGSharp Save You from Ban While Spoofing Pokemon Go On Realme Narzo 60 Pro 5G? | Dr.fone
- In 2024, How to use iSpoofer on Realme GT 5? | Dr.fone
- In 2024, Where Is the Best Place to Catch Dratini On Honor Magic 6 Pro | Dr.fone
- Play Store Not Working On Oppo F25 Pro 5G? 8 Solutions Inside | Dr.fone
- Pokémon Go Cooldown Chart On Realme Narzo 60x 5G | Dr.fone
- Snapshot Strategies Capturing Win10 Gaming Excellence
- Unstuck Your Screen: Techniques to Find and Move Lost Windows Easily
- Title: In 2024, All You Need To Know About Mega Greninja For Honor X8b | Dr.fone
- Author: Elizabeth
- Created at : 2025-01-17 03:46:11
- Updated at : 2025-01-24 07:46:02
- Link: https://pokemon-go-android.techidaily.com/in-2024-all-you-need-to-know-about-mega-greninja-for-honor-x8b-drfone-by-drfone-virtual-android/
- License: This work is licensed under CC BY-NC-SA 4.0.