
Detailed guide of ispoofer for pogo installation On Honor X8b | Dr.fone
Detailed guide of ispoofer for pogo installation On Honor X8b
Pokemon Go is Niantic’s most successful game that has taken the world by storm. Players get to be a part of the various regions of the Pokemon has now become one with our world. The game requires you to travel to different locations to complete researches, catch Pokemon, defend gyms, and most importantly, complete the Pokedex given by Professor Willow. Niantic’s games are designed to be played with others outdoors. This feature ends up giving players in some parts of the world advantage over others. This is specially to catch regional Pokemon and during ticketed events and sponsored events. Spoofers can avoid the barriers of distance and play anywhere in the world by iSpoofer for pogo installation and other such apps. Niantic, however, does not allow this and considers it the same as hacking. Players who were looking to play and access all the features of the game available all across the world.
Part 1: Will the iSpoofer back on 2020?
iSpoofer has been shut down. All its applications, websites, and other related services have been terminated. iSpoofer for pogo installation does not exist. If any website claims to give access to the application or iSpoofer direct download, it is fake. Also, the new Pokemon Go application version which is 0.195.0 has been updated to detect applications like iSpoofer, so on being detected, it may lead to a warning, or a permanent ban as well. And we don’t see the certainty to get it back soon.
Part 2: Detailed guide of iSpoofer for pogo installation
This detailed guide for iSpoofer installation is for those who still possess the older version of the app that works in an older iOS version.
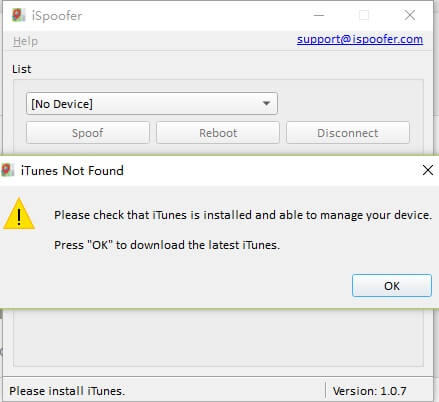
Step 1 – Install the setup for iSpoofer on your computer if you had got it using. This requires the latest version of iTunes, so make sure that you have it installed.
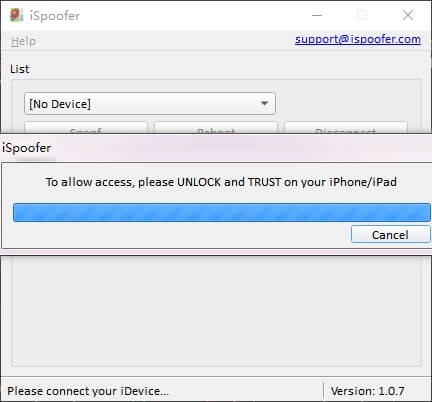
Step 2 – Once the setup is done, connect your phone to the computer and unlock it. You will have to select the “TRUST” option for the software to do its work. On selecting this option, iSpoofer will download a developer file that will spoof the location.
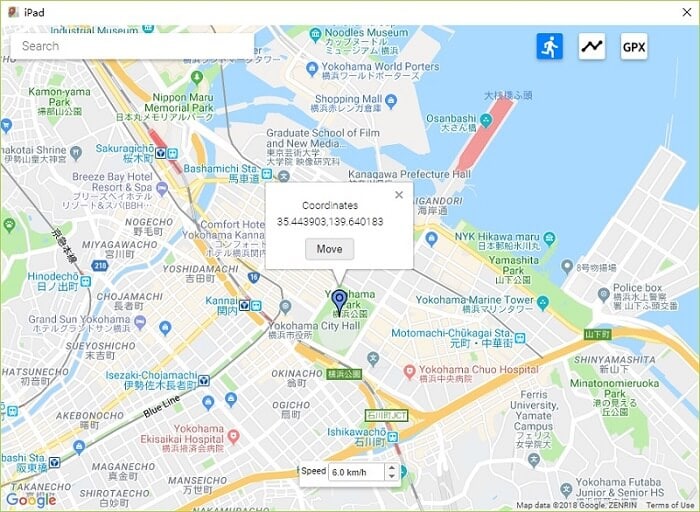
Step 3 – A map will load on your computer screen, which allows you to enter or point the location. Enter the location of your choice and click on “MOVE”. And that is it! Three simple steps and you have spoofed!
Part 3: How to use the iSpoofer when you play pokemon
Follow the tutorial above for ispoofer for pogo installation. A mock location has now been added to your device that makes iOS believe that you are at the entered spot.

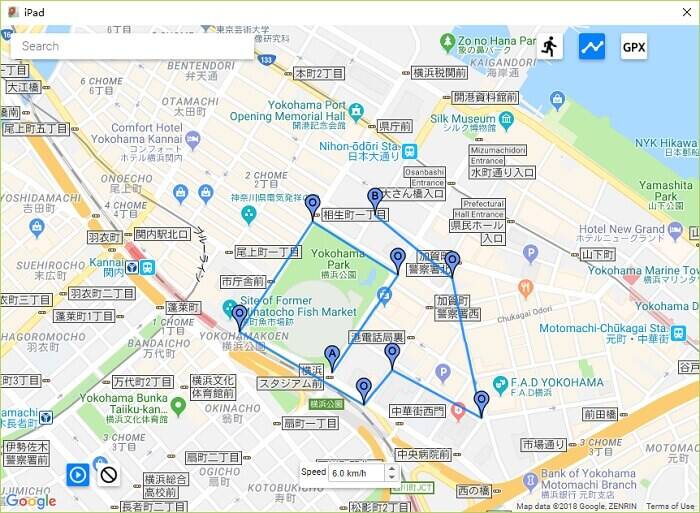
Following these steps, disconnect your phone and launch Pokemon Go. From here you can either use the joystick to move around or use a “.gpx” file to add a preset route for you to move around. That would look like this -
iSpoofer for pogo installation has the following disadvantages -
- The application cannot work without iTunes and is very dependent on it.
- Niantic can easily detect spoofing through this app and may lead to a ban.
- Movement simulations are hard and unnatural, making it more susceptible to a ban.
- Configurations and settings require some technical knowledge in to troubleshoot any errors.
- The app is prone to crashing a lot. The interface sometimes cannot handle the constant change of locations.
All these issues are overcome with great detail by Dr. Fone Virtual Location (iOS) by Wondershare.
Part 4: Safer tool to spoof pokemon- drfone virtual location
Pokemon Go Spoofers using iOS need not depend on iSpoofer for jumping locations. Dr. Fone Virtual Location by Wondershare is the new, safer app to spoof in Pokemon Go. The app uses mock location services to help you teleport to anywhere across the world. This also allows you to be safe from the detection software in Pokemon Go.
What are the benefits of using Dr. Fone Virtual Location?
- It provides a mock location and location changer – With just a single click, the application can change your location to where you want to. All apps on your phone will start recognizing this location.
- It enables you to move at different speeds - It has 3 different speeds, namely walking, cycling, and driving that helps you travel faster or log in kilometers too.
- The joystick allows movement – You can use the joystick to move your character around the map to navigate to Pokestops or rare wild spawns easily.
- The map view gives a 360o view – By scrolling around the screen, you can get to see all the routes around you and plan accordingly.
- Auto-walk feature - The game has an auto-walk feature in case you do not want to use the joystick to move around manually.
- Keyboard movement commands – The player can also use the A, S, W and D keys on the keyboard to move around
Step by Step Guide to Install and use Dr. Fone Virtual Location -
Step 1 - Download the Dr. Fone Virtual Location by official Wondershare website. Connect your phone to the computer in to execute the changes. Click on the “Virtual Location” option.

Step 2 – Now, on the next screen, you will see “Get Started” option. Click on it to proceed.

Step 3 – The screen will now show a map with your current location on it. In case the location is incorrect, click on the “Center On” button at the bottom-right side of your screen.

Step 4 – Select the “teleport” option by clicking on the icon on the top right corner. Then, in the text box, enter the city or the location’s exact name or the coordinates in the “latitude, longitude” format.

Step 5 – After entering your location, select the “GO” option.
Step 6 – The app will show you an option that says “Move Here”. Click on it, and now you have successfully spoofed to your location of choice.

Your spoofed location is now the default location of your phone, and all the apps will recognize it. The maps app on your phone looks like this –

The teleportation is now complete. Enjoy playing the game with no lags or errors.
Alert
While spoofing between two distant locations give the required amount of time for the cooldown timer to reach zero. If you decide to spoof too quickly, you will automatically trigger a soft ban, and you will not be able to play most parts of the game like catching Pokemon or spinning Pokestops. If this occurs consistently over multiple occasions, it will trigger Niantic’s warning and may end up getting a permanent ban. It has a 3-strike policy. 3 warnings are given before the account is permanently deleted.
The notice looks like this -

The cool-down period between two locations is based on distance and you can refer to the table below to understand the time you need to wait before logging in again.
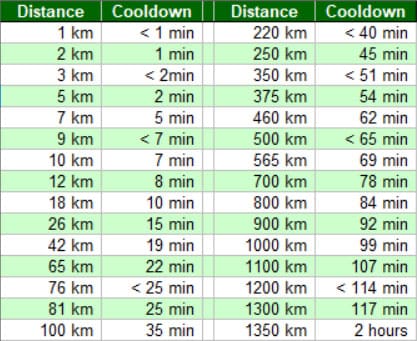
Most gamers wait for the standard 2 hours before logging in again. This gives them access to all the game’s features like before.
Conclusion
We hope that this article has been informative, about Dr Fone Virtual Location and ispoofer for pogo installation. You can now spoof locations with ease by using Dr.Fone - Virtual Location app. Vigilance is needed, and spoofing must be done by following all rules of cool down. This would prevent you from being caught by Niantic, and by Officer Jenny. We would like you to enjoy the game throughout without having to lose any of your levels and Pokemon.
How does the stardust trade cost In pokemon go On Honor X8b?
Pokemon go has been around for a while now and has arisen as one of the most talked-about games in the gaming community. The fact that it is a location-based game and needs you to move around while playing the game makes it further interesting. Trading in Pokemon go is one of the most talked-about features. Today, we will help you explore more about stardust trade costs and how can you easily perform trades! Hang on as we dwell deeper into Pokemon go and trade stardust costs.
Part 1: How does Pokemon trading work?
So as we’ve discussed earlier, Pokemon go trading is one of the most interesting features of the game. So how does this trading work? In Pokemon Go, you can trade pokemon possessed by you with those possessed by your friends if both you and your friend, decide to mutually trade the pokemon with each other! For trading in Pokemon go, there are certain criteria you need to satisfy to qualify for trading in Pokemon go! Given below are the requirements to qualify for trading in Pokemon go
- Be at least level 10
- Be friends with the person you’re trading on Pokemon go
- Be in a radius of 100 m while you’re trading
However, Pokemon go also has levels of friendship and you can trade pokemon of different levels with friends with whom you have different friendship levels. Higher is the friendship level, higher is the level of Pokemon which you can trade. every trade requires you and your partner to spend stardust points. So There are basically 4 levels of friendship in Pokemon go
- Friend
- Good friend
- Ultra friend
- Best friend
The levels of your friendship with a player on Pokemon go increase with the increase in the number of days you stay friends with them. Within a month of friendship, you can become best friends with a player on Pokemon go! You also need stardust points on Pokemon go. So what is stardust trade cost? Before you trade any pokemon you must spend stardust coins. Not having enough stardust trade coins will not allow the trade of pokemon to happen. Hence, you must have enough stardust trade costs.
Part 2: How much stardust do you need in pokemon trading costs?
Trading in Pokemon go is quite complex. This is because the needed Stardust points will be different in every case and will depend on several factors. Factors such as whether you already half got that Pokemon in your pokedesk or not, the friendship level of you and your friend who are interested in trading, or whether the Pokemon is rare or common. Given below are the Stardust trade costs for each Pokemon.
Standard trades
- Good friend:100
- Great friends:80
- Ultra Friends: 8
- Best friend: 4
Shiny or legendary (caught by you)
- Good Friend: 20,000
- Great Friend: 16,000
- Ultra Friend: 1,600
- Best Friend: 800
Shiny or Legendary (not caught by you)
- Good Friend: 1,000,000
- Great Friend: 800,000
- Ultra Friend: 80,000
- Best Friend: 40,000
However, this Stardust trade cost may vary according to the friendship levels! Before trading, you must think of the friendship level between you and your friend and also if the Pokemon which has been traded can be evolved through trading. Evolving Pokemon through trading is another beneficial tactic that could benefit you as a player of Pokemon go.
Part 3: Ways to increase stardust in pokemon go?
1. Use Dr.Fone – Virtual Location (iOS/Android)
Do you want to increase your Stardust trade cost in Pokemon go? There is no better way for doing so other than using Dr.Fone - Virtual location (iOS/Android) . Using this will easily help you to catch more Pokemon, as you can fake your location using this app. You can change your location to any given location on the map and catch Pokemons from different regions without having to move around. Doesn’t it sound fun? Catching the rarest Pokemon all by sitting at home!
Teleport to anywhere in the world
Step 1: Firstly, you need to install Dr.Fone- Virtual location (iOS/Android) on your computer(Win/Mac). Then, install and launch the program on your computer. Click on “Virtual Location” from the options on the main interface.
Step 2: Now, you need to connect your iPhone to the PC and click on “Get Started”.
Step 3: A new window would now pop up where you can see your current location. If you are unable to see your current location, then click on “center on” icon at the bottom. Doing so will lead you to show your location on the map.
Step 4: Now click on “Teleport mode” using the button on the top right corner of the window. Enter the place you want your location to be set to and then click on “Go”. Once done the click on “Move Here”. Well, that’s it! We’re done with changing our location to the desired location!
2. Exchange the gift with friends to level up a friendship
Pokemon go also allows you to send gifts to your game friends and receive gifts from your game friends. Well, this can help both of you grow and progress in the game and can be a helpful trick to increase Stardust!
3. Play the game as much as you can
Investing more and more time on the game will lead you to catching more pokemons which will, in turn, lead to getting more stardust! Hence play it regularly with continuity!
Conclusion
Well, the article did give us a lot of idea about stardust trade cost and how to increase Stardust trade points in Pokemon go. We dwelled more into major facts about the game and learned a lot about it. We also explored what is drfone-Virtual location (iOS) and how it can help you to teleport from one place to another! Using the app will help you a lot in improving the game and wouldn’t require you to do much! All you’ve to do is teleport from one place to another, catch more and more pokemons and get more stardust! As a player, it shall improve your stats by a huge margin!
Pokemon Go Error 12 Failed to Detect Location On Honor X8b?
Pokemon Go is a popular game that has taken the world by storm. It is an augmented reality game that allows players to catch Pokemon in the real world using their smartphones. However, many players have reported encountering the “Failed to detect location (12)” error while playing the game. This error can be frustrating as it prevents players from playing the game properly. In this article, we will discuss what causes the “Failed to detect location (12)” error in Pokemon Go and how you can fix it on your Honor X8b.
Pokémon Go has been on the nerves of its players and this is all because of the AR notion that it presents. The failed to detect location 12 is one of the most common errors that are faced by the players while playing this game. You might not believe but the GPS signals and the location settings on iPhone or Android are the two main reasons for this error. It can be resolved with ease and this article has been written to get the work done with ease. Applying the methods explained will ensure that you get the best results overall.
Part 1: Why is Location Important in Pokémon Go?
The best part of this game is that it has been compiled keeping in view the location mechanics. The location analytics of the game has made sure that it becomes the overnight sensation. Three main attributes are associated with the location framework of the game. These attributes also show how important the location is for the game. Understanding these attributes will also make sure that the user can overcome the errors such as failed to detect location 12 GPS joystick 2019.
i. Physical World Attribute
The best part of this attribute is that it is the center of the user experience of the game. The second part is the fact that this map has evolved and there are no shortcuts to its success. Ingress was the previous game that was developed by Niantic and the crowdsourcing of this map started with the evolution of this application. This was developed by the same team that is working on the core of Google Earth.
ii. Real World Gestures
The augmented reality is another important aspect that is related to Pokemon Go and this also means that the location services are relied on when it comes to this application. The android and the iOS location services are continuously used by the game to provide the pinpoint locations as well as the game features that are not found in other applications. The use of location through GPS satellites even becomes more important for such gestures. Especially when the player is outdoors it becomes too important to deal with using GPS location.
iii. Place Attribution
The system within the system that has been designed by the game developers makes sure that the location inaccuracies are accounted for. This also means that the 4-meter accuracy of the GPS is further enhanced to deal with the perfect location identification of each player.
Part 2: Ways to Fix Error 12 on Pokémon Go
Several ways can be used to make sure that the subject error is resolved with ease. This section of the article will deal with all such ways that can be used to get the work done with ease and perfection.
Method 1: Enable Mock Locations
As the name suggests it is to set the fake location using the build-in iPhone feature. It will also make sure that the feature of the game continues to work perfectly.
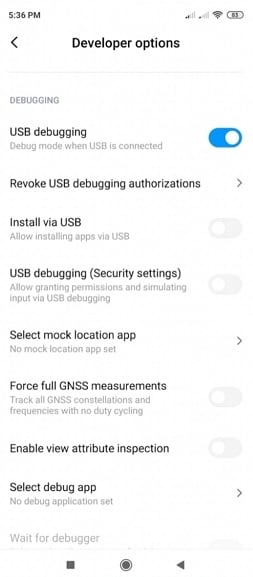
Step 1. Go to the developer options of your device. To get to the developer options simply head over to the settings > About Phone > Software Info > Build number and tap it 7 times to enable the mock locations.
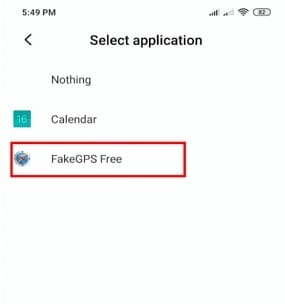
Step 2. Install the Fake GPS that is a free application and can easily be found on the Play Store.
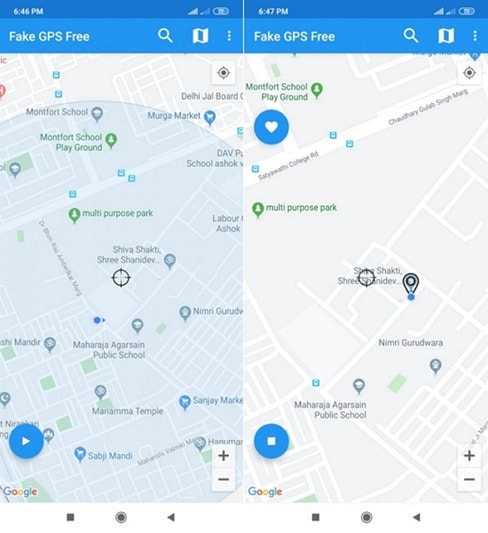
Step 3. Launch the application and you can easily enjoy Pokémon Go without any hassle and trouble and resolve the Pokémon go failed to detect location 12 fake GPS error.
Method 2: Location Activation
This is another important and easy way to make sure that the Pokémon failed to detect location 12 error is resolved with ease and perfection. To execute the process the steps are mentioned as follows:
Step 1. Open the settings on your Phone to start with:
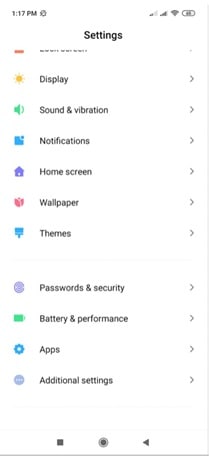
Step 2. Tap on the passwords and security to proceed with the process:
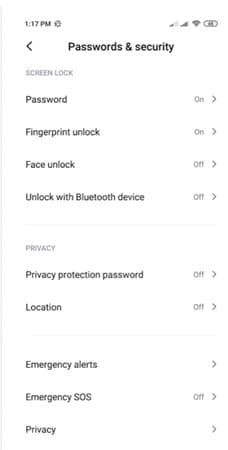
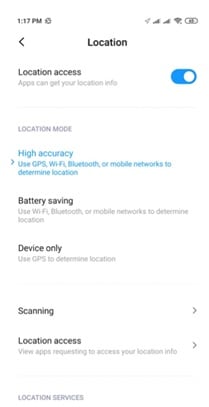
Step 3. Tap to turn on the location to finish the process and eliminate the failed to detect location 12 Pokémon Go errors.
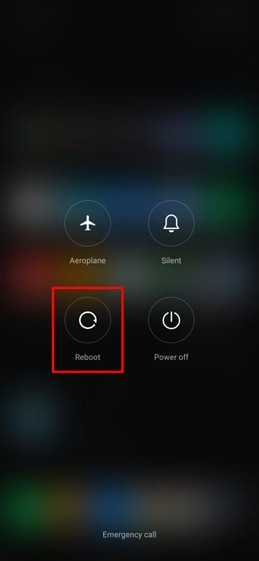
Method 3: Reboot the Honor X8b device
This might seems weird but this trick has been working to quiet some time now and has been proven to eliminate the failed location 12 Pokémon Go issue. There is a possibility that the server location is not synced with the Honor X8b device. Restarting the Honor X8b device will make sure that both the locations are sync and the problem is resolved with ease.
Just long-press the power button and choose the reboot option from the menu that appears to complete the process in full.
Part 3: Best Way to Overcome Location Error 12 on Pokémon Go for iOS Devices
Dr. Fone Virtual location is the best tool to overcome issues such as failure to detect location 12 Pokémon go on iPhone. The program has been designed to make sure that the GPS location is spoofed and you get the perfect outcome in resolving the error under discussion.
The Process
Step 1: Program Installation
To begin the process, download and install the program to get going with the process.
Step 2: Enable Virtual Location
Connect your iPhone and enable virtual location from the options of the program. Hit get started to begin the spoof.
Step 3: Locate yourself
The center on the button on the next screen is to be clicked to get the accurate location.
Step 4: Teleportation
On the upper right corner click the icon on the third to begin teleportation or spoofing to be precise. Enter the name of the place where you want to teleport to.
Step 5: Move to the teleported location
Click on move here and the system will move you to the location that has been entered.
Step 6: Validate and Completion
The location will be locked by the program and your iPhone will also show the same location as on Dr. Fone. This also completes the process in full:

Conclusion
Dr.Fone - Virtual Location is the best and the state-of-the-art program to overcome Pokémon go unable to detect location 12 on iOS devices. It has an intuitive interface and it also allows the users to overcome the issues that traditional spoofing programs present. It is being updated constantly which also means that you will be able to get the best results. There is no program on the internet that can resolve the error that failed to detect location 12 in Pokémon go as easily as this one does.
Also read:
- [New] In 2024, Optimal PPT Presentation Capture Methods
- [New] The Ultimate Guide to Adding YouTube Media to Google Slides for 2024
- [Updated] 2024 Approved Essential Audio Recording Gear for iDevices
- [Updated] Audience Favourite Debate Which Is Better, Black GoPro or Sony FDR-X1000V?
- [Updated] Innovative Methods to Subtly Soften Audible Output via Lumafusion
- 2024S Must-Have Recording Applications for Aspiring and Seasoned Guitar Players
- Best 45 Kid-Friendly Melodies for Toddlers - Free MP3 and MP4 Song Files Download
- Best Pokemons for PVP Matches in Pokemon Go For Realme Narzo 60x 5G | Dr.fone
- CatchEmAll Celebrate National Pokémon Day with Virtual Location On Tecno Camon 30 Pro 5G | Dr.fone
- Fixing Steam App's Dll Issues
- Here are Some of the Best Pokemon Discord Servers to Join On Realme V30 | Dr.fone
- How PGSharp Save You from Ban While Spoofing Pokemon Go On Honor Play 40C? | Dr.fone
- In 2024, Here Are Some Reliable Ways to Get Pokemon Go Friend Codes For Honor Magic 6 Lite | Dr.fone
- In 2024, How Can I Catch the Regional Pokémon without Traveling On Tecno Spark 20C | Dr.fone
- In 2024, How to Fix Pokemon Go Route Not Working On Poco C65? | Dr.fone
- In 2024, Which Pokémon can Evolve with a Moon Stone For Poco C50? | Dr.fone
- List of Pokémon Go Joysticks On Honor Magic 5 Pro | Dr.fone
- Mastering iPhone Keyboard: A Complete Guide to Typing with Emojis
- Windows 10資料夾備份至QNAP NAS:運用2種有效方法
- Title: Detailed guide of ispoofer for pogo installation On Honor X8b | Dr.fone
- Author: Elizabeth
- Created at : 2025-01-19 11:07:06
- Updated at : 2025-01-24 04:16:19
- Link: https://pokemon-go-android.techidaily.com/detailed-guide-of-ispoofer-for-pogo-installation-on-honor-x8b-drfone-by-drfone-virtual-android/
- License: This work is licensed under CC BY-NC-SA 4.0.